
The shot is the foundation, but frothed milk is what builds the drink. Without it, a latte is espresso with cold milk poured in. With it, you get that smooth, velvety texture that makes the difference between something you tolerate and something you actually look forward to.
This guide covers three methods: the steam wand (the best results, and the tool built into every EspressoWorks machine), the handheld frother (quick, no technique required), and the jar method (no equipment at all). The steam wand section gets the most detail, because that's where the real technique lives.
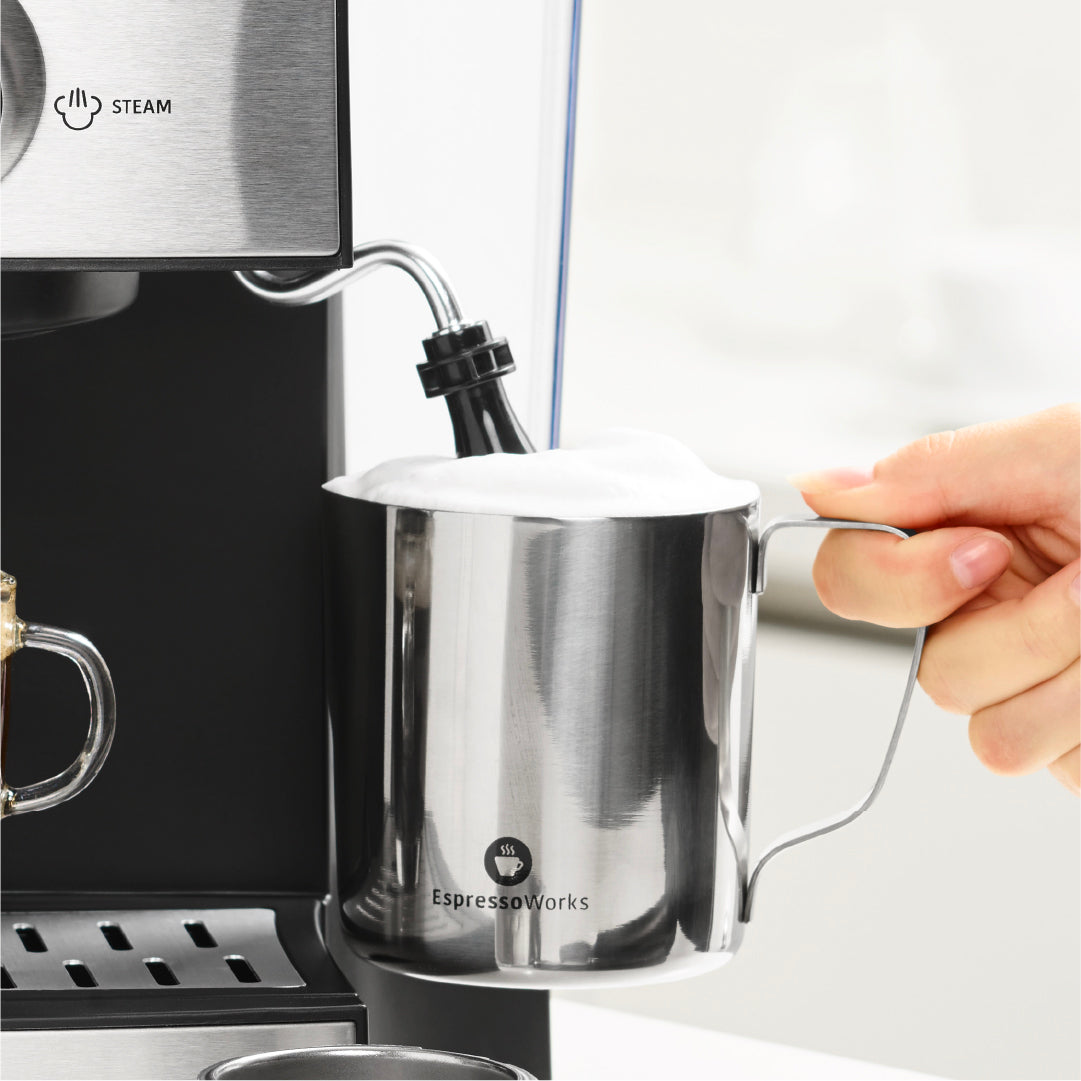
How to Froth Milk with a Steam Wand
The steam wand produces something the other two methods can't match: true microfoam. That's the fine, glossy, pourable texture you get in a properly made café latte - not a pile of airy bubbles sitting on top, but milk that's been stretched and textured into something silky all the way through.
What You Need Before You Start
Start with cold milk, straight from the fridge - 35-40°F / 2-4°C. Cold milk gives you more working time before the temperature climbs out of range. Room temperature milk heats too fast and leaves you with less control.
You'll need a stainless steel frothing pitcher. Every EspressoWorks machine set includes one, and you can browse our full range of frothing pitchers and accessories if you want extras or a different colour.
A clip-on thermometer is worth having when you're learning. You'll develop a feel for the palm test with practice, but a thermometer removes the guesswork early on. Before you start, purge the steam wand for 1-2 seconds to clear any condensed water that's built up inside - this gives you clean, dry steam from the first second.
The Stretching Phase
Position the steam wand tip just below the milk surface - around 1/4 inch deep. Open the steam valve fully and hold the wand near the surface to introduce air. You're listening for a controlled hissing, tearing sound. That's correct. A loud screech means the tip has broken the surface - lower it slightly until the sound settles back to that steady hiss.
This phase adds the air that becomes the foam. Keep the wand near the surface until the milk has grown by roughly 30-50% in volume. Cappuccinos need more stretch than lattes - that thick foam layer comes from extending this phase. Stop stretching when the milk reaches around 100°F / 38°C. At that point, move straight to texturing without pausing.
The Texturing Phase
Submerge the wand tip deeper into the milk and tilt the pitcher slightly to create a vortex. You'll see the milk begin spinning in a circular motion - keep it going. The vortex is what breaks large bubbles down into microfoam and gives the milk its silky, consistent texture throughout.
Maintain the vortex until the milk reaches 140-150°F / 60-65°C. Above 160°F, the milk scorches and loses its natural sweetness - the drink will taste flat and slightly burnt. If you're not using a thermometer, use your palm: when the base of the pitcher is too hot to hold comfortably for more than a second, you're at temperature. Close the steam valve immediately.
The Swirl-and-Tap Finish
Tap the pitcher firmly on the counter 2-3 times. This pops any large surface bubbles that made it through the texturing phase. Then swirl the pitcher in a steady circular motion for 10-15 seconds - this keeps the microfoam integrated with the rest of the milk rather than letting it separate out on top.
The milk should look glossy and paint-like, with a smooth, even surface and no visible bubbles. Pour it within 20-30 seconds. Microfoam degrades quickly once the steam stops, and the texture you worked for will start breaking down if you leave it sitting in the pitcher.
How to Froth Milk with a Handheld Frother
If you want frothed milk without the technique learning curve, the handheld frother is the answer. It produces lighter, airier foam rather than the dense microfoam you get from a steam wand - the bubbles are larger and the texture is less silky - but it works well for cappuccinos, flavoured lattes, and any drink where you're not chasing latte art.
Here's the thing: a handheld frother doesn't heat the milk. Heat it separately first - microwave or stovetop to 140-150°F / 60-65°C, the same target as the steam wand method. Then submerge the frother head just below the milk surface, tilt your cup or pitcher slightly, and run it for 20-30 seconds. Move the frother up and down gently as you go - this pulls air through the full depth of the milk rather than aerating the top layer only.
Finish the same way you would with a steam wand: tap the pitcher on the counter once or twice to pop larger bubbles, then swirl for 10 seconds before pouring.
If you've picked up your EspressoWorks machine and the steam wand feels like a lot to take on immediately, start here. The handheld frother produces properly frothed milk in under a minute - and once you know how to heat, froth, and finish, switching to the steam wand is a short step from there.
The Jar Method (No Equipment Needed)
No pitcher, no frother, no steam wand required. If you have a jar with a lid and a microwave, you have everything you need.
Fill the jar one-third full with milk - no more. The foam needs room to expand, and a jar that's too full will spill over. Seal the lid tightly and shake vigorously for 30-60 seconds, until the milk has roughly doubled in volume. Then remove the lid and microwave the jar for 30-45 seconds. The heat stabilises the foam and brings the milk up to drinking temperature.
The foam you get is coarser than what a steam wand or handheld frother produces - larger bubbles, less stable, and it breaks down faster. It works well for cappuccino-style drinks where a thick foam layer sits on top. It won't give you the pourable, paint-like microfoam you'd need for latte art.
Two practical notes: the shaking is louder than you'd expect, and the microwave step isn't optional - shaking alone gives you foam, not warm foam. Use this method when equipment isn't available, or when a quick cappuccino at home is the goal and you want minimal setup.
Which Milk Froths Best
The method matters less than the milk. Fat content and protein structure determine how well any milk froths - and understanding those two variables explains every result you'll get in the pitcher. Fat creates the rich, creamy body in the foam. Protein - specifically the whey and casein in dairy - forms the bubble network that holds everything together. Whole milk leads on both counts, at around 3.5% fat and 3.2g of protein per 100ml. That combination is why it produces the densest, most stable microfoam and why it's the benchmark every other milk gets measured against.
| Milk Type | Foam Quality | Stability | Best For | Temp Target | Difficulty |
|---|---|---|---|---|---|
| Whole milk (3.5% fat) | Dense, silky microfoam | High | Lattes, flat whites, latte art | 140-150°F / 60-65°C | Low |
| Semi-skimmed (~1.5% fat) | Lighter, more volume | Medium | Cappuccinos, flavoured lattes | 140-150°F / 60-65°C | Low |
| Oat - barista edition | Smooth, consistent | Medium-high | All milk drinks | 130-140°F / 55-60°C | Medium |
| Almond - barista edition | Thin, inconsistent | Low | Cappuccinos | Below 140°F / 60°C | High |
| Soy | Good texture, consistent | Medium | Lattes, cappuccinos | 130-140°F / 55-60°C | Medium |
For plant-based milks, three adjustments make a consistent difference: use fresher milk, lower your temperature target to 130-140°F / 55-60°C, and stretch less aggressively than you would with dairy. The protein structures in oat, almond, and soy are less heat-stable than dairy proteins - push the temperature too high and the foam collapses or the milk separates in the cup. Barista-edition oat and almond milks include added stabilisers that meaningfully improve consistency; if you're frothing plant-based milk more than occasionally, they're worth buying over standard carton versions.
One note specific to soy: it can separate when it meets the acidity of espresso directly. Pour the milk into the cup first, then add the shot, and it stays stable.
Why Your Milk Won't Froth (and How to Fix It)
Most frothing problems trace back to one of three things: wand position, temperature, or starting conditions. Each one has a clear fix - and once you know what to listen and feel for, you'll catch the problem before it ruins the drink.
Large bubbles instead of microfoam. The steam wand is too shallow during the texturing phase. Submerge the tip deeper into the milk and angle the pitcher until you see the vortex spinning. The vortex is what breaks large bubbles down into microfoam.
Milk not growing in volume during stretching. The wand tip is too deep. Pull it up toward the surface until you hear the controlled hissing sound. No hiss means no air is entering the milk.
Milk scorching or tasting bitter. You've gone past 160°F / 70°C. Add a clip-on thermometer to your setup, or palm-test every few seconds as you approach temperature.
Foam collapses immediately. The milk was too warm before you started. Cold milk straight from the fridge (35-40°F / 2-4°C) gives you the working time you need. Room temperature milk climbs too fast to control.
Plant-based milk separating. Temperature too high or the stretching phase ran too long. Lower your target to 130-140°F / 55-60°C and shorten the stretching phase compared to what you'd do with dairy.
Foam too stiff or dry. You stretched too long during the aeration phase. Move to the texturing phase sooner - the milk should only reach around 100°F / 38°C before you submerge the wand.
Poor vortex control. Almost always a pitcher-sizing issue. The milk needs enough depth to spin properly. Don't fill your pitcher more than half full, and use a smaller pitcher for single drinks.
Frequently Asked Questions
What temperature should milk be when frothing?
140-150°F / 60-65°C is the target for dairy milk. Below that range, the milk hasn't developed its natural sweetness and the foam is less stable. Above 160°F the milk scorches - the proteins denature and the sugars break down, which gives the drink a flat, slightly bitter taste that no amount of good espresso will cover. The palm test works reliably once you've used it a few times: wrap your hand around the base of the pitcher as you steam, and the moment it becomes too hot to hold comfortably, close the valve.
Can I froth milk without a steam wand or frother?
Yes. Fill a jar one-third full with milk, seal the lid, and shake vigorously for 30-60 seconds. Then microwave for 30-45 seconds to heat the milk and stabilise the foam. The result is coarser than steam wand microfoam, but it works well for cappuccino-style drinks when you have no other equipment available.
Why is my frothed milk full of large bubbles?
The steam wand is too shallow during the texturing phase - submerge the tip deeper and angle the pitcher until you see the vortex spinning. Also check your finish: swirl the pitcher for 10-15 seconds after steaming and pour within 20-30 seconds. Microfoam degrades quickly once the steam stops.
Does whole milk froth better than oat milk?
Yes. Whole milk's fat content (3.5%) and protein (3.2g per 100ml) produce denser, more stable microfoam than any plant-based alternative. Barista-edition oat milk is the closest plant-based option - keep the temperature at 130-140°F / 55-60°C and stretch less aggressively than you would with dairy.
What's the difference between frothing for a latte vs a cappuccino?
Stretch duration. For a cappuccino, stretch until the milk has grown by around 50% in volume to build the thick foam layer on top. For a latte, stop at 20-30% growth and concentrate on the texturing phase to get silky, pourable microfoam. Same technique, different stretch time.
Three methods, one goal: milk that actually improves the drink. The steam wand is where the real skill lives, and it's built into every EspressoWorks machine. The first few attempts will teach you more than any guide can - the controlled hiss during stretching sounds obvious once you've found it, and the texturing vortex clicks within a few sessions. Most people get there within a week of daily practice, and the difference in the cup from attempt one to attempt five is significant.
If you're building out your frothing setup, our milk frothing accessories collection has stainless steel pitchers, handheld frothers, thermometers, and everything else you need to practise with the right equipment from the first pour.


Share:
How To Make Café De Olla At Home
How To Make Pour Over Coffee